

Community post
Raspberry Pi 3 + NODE-RED TUTORIAL : Controlling LED with Relay
Node-RED is an open-source graphical development (drag & drop) tool created by Nick O'Leary from IBM that helps you rapidly create application, especially event-driven application like Internet of Things (IOT) applications. It is already pre-installed in Raspbian Stretch for Raspberry Pi, or it can be installed by using Node.js.
The main reason we use Node-RED in this tutorial is because it does not require a very hardcore programming knowledge. It is simply drag and drop block of function, we call it node and then we put them all together.

Hardware Requirements for this project:
- Raspberry Pi 3 Model B
- 8GB MicroSD Card
- MicroSD Card Reader (for installation)
- 4 Channel Relay
- Breadboard
- Resistor 220 Ohm x4
- LED x 4 (Any color)
- Screwdriver
- Male to Male Wire Jumper x16
- Female to Male Wire Jumper x8
- Bluetooth keyboard & mouse
- Monitor with HDMI cable + Micro USB Power Adapter
- Long nose plier (Optional)
Step 1: Download Raspbian & Install Raspbian OS into Micro SD
*if you already have raspbian before, just skip this step.
- Download zipped Raspbian & Etcher from official website.
- Unzip raspbian folder
- Insert Micro SD to your computer
- Install etcher to your computer
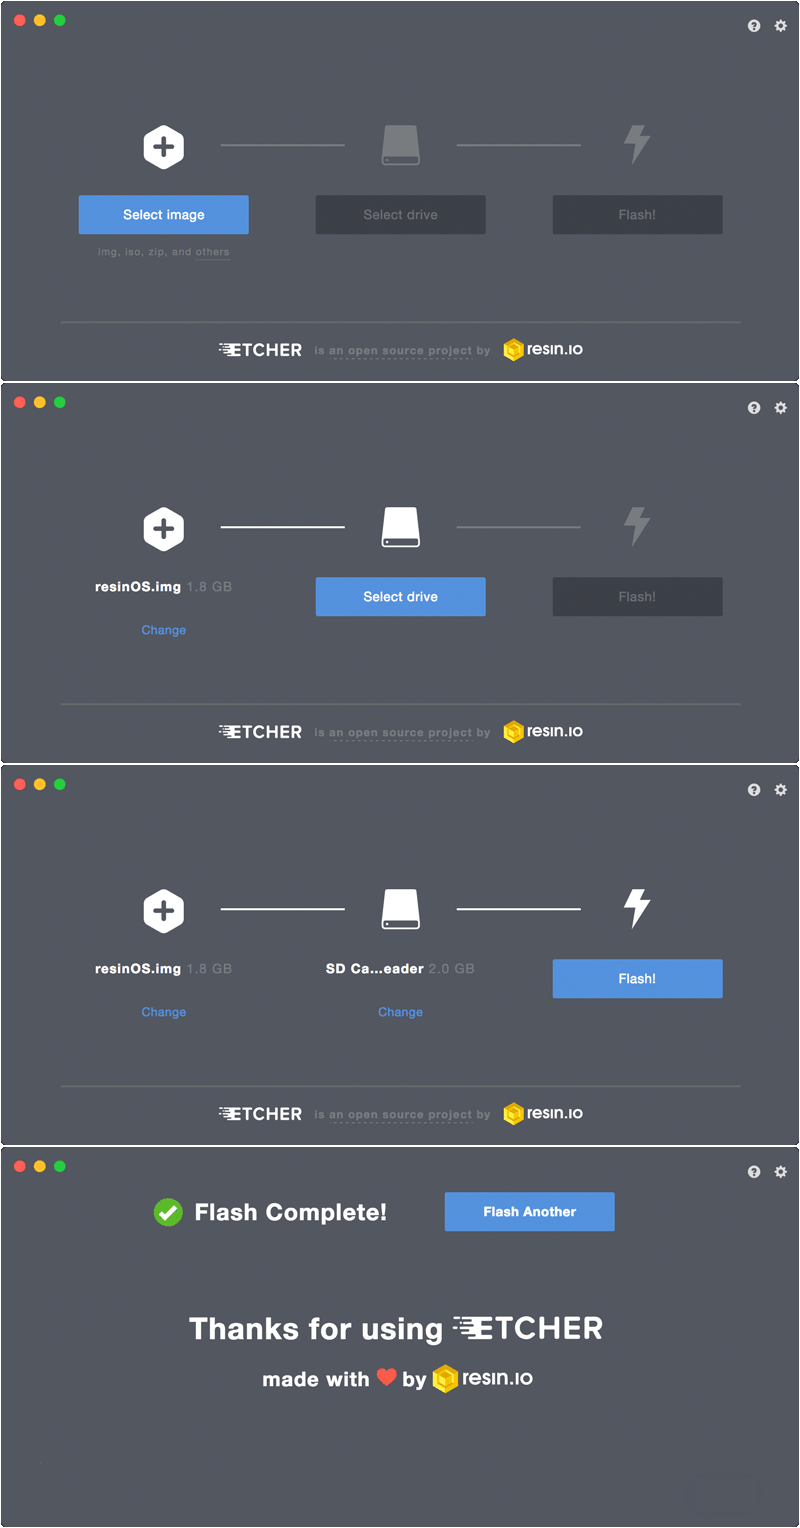
- Once installed, run etcher it will look like below:
- Click button “Select Image” and choose raspbianOS.image file
- Make sure your MicroSD is selected, otherwise click “Change” and choose your MicroSD path.
- Hit button Flash and wait until finish. Once finish, safely remove the micro sd
Step 2: Assemble the wiring
Follow with these schematic:

| Raspberry Pi Pin | 4 Channel Relay |
|---|---|
| Pin 4 (5v Pin) | VCC/ +Ve |
| Pin 6 (GND) | GND /-Ve |
| Pin 35 (GPIO 19) | IN 1 |
| Pin 37 (GPIO 26) | IN 2 |
| Pin 38 (GPIO 20) | IN 3 |
| Pin 40 (GPIO 21) | IN 4 |
Step 3: Let's node-red it
- Insert MicroSD into SD slot at Raspberry Pi.
- Plug in HDMI cable to HDMI port Raspberry Pi.
- Plug in the micro usb power adapter and switch on Raspberry Pi.
- Ensure your raspberry pi has internet connection.
- Open terminal by click the terminal icon at top left or press keyboard “Ctrl+Alt+T”
- Type “node-red-start” and copy the IP address shown in terminal

- Open web browser and paste/type the IP address that shown in terminal.
*Tips: it better bookmarked it at your web browser.

- Before we start the magic, we need to install new palette in node-red
node-red-contrib-gpio
node-red-contrib-ui_j-
Click the burger menu on top right corner, then click “Manage Palette”

-
Select Install Tab, then search and install each the
node-red-contrib-gpio&node-red-contrib-ui_j


-
Once finish install, click Close.
-
- Drag the “Switch” Node from ui category & “rpi-gpio-out” node from rpio category into Flow Panel.Rename each Switch node with naming convention for example Switch_1. Add Name of Group “Relay” for grouping the node for Web Design once deploy it. Set the On Value to 1 and Off Value to 0. For rpi-gpio out set all the Raspberry Pi Pin**(Pin 35,Pin 37,Pin 38, Pin 40)** from Step 2 except for 5V and GND Pin. Rename rpi-gpio pin to naming convention for example Pin_37. Then click Done button.


- Once finish the configuration for each node it will look like this:

Then connect each node for example Switch_1 connect to Pin_35 this:

- Then click Deploy Button. It’ll show Deploy Successful.
And you have it. - Open new tab in browser copy and paste the ip address of node red and add /ui at the end for example: http://127.0.0.1:1880/ui
- Your website UI will look like this:

Extra: Auto start Node Red at every boot
- Open terminal
- Type “sudo system enable nodered.service”. Remove the “ ”, and hit Enter.
Your node-red will auto start every time Raspberry Pi boots up.
Replies (7)
Great article on Node Red
good tutorial..for noobies like me
Hey, Welcome to Steemit. Just a suggestion, right now is better to set your rewards to 50/50 so you can get more. Another thing is that you can try out Utopian for claiming rewards for making tutorial for open source project.
Hope to see more of your content! Steem-On!
thanks mate
Congratulations @amir3hamzah, you have decided to take the next big step with your first post! The Steem Network Team wishes you a great time among this awesome community.
The proven road to boost your personal success in this amazing Steem Network
Do you already know that awesome content will get great profits by following these simple steps, that have been worked out by experts?
Congratulations! This post has been upvoted by SteemMakers. We are a community based project that aims to support makers and DIYers on the blockchain in every way possible. Find out more about us on our website: www.steemmakers.com.
If you like our work, please consider upvoting this comment to support the growth of our community. Thank you.
Congratulations @amir3hamzah! You have completed some achievement on Steemit and have been rewarded with new badge(s) :
Click on any badge to view your own Board of Honor on SteemitBoard.
For more information about SteemitBoard, click here
If you no longer want to receive notifications, reply to this comment with the word
STOP