

Community post
文章排版-图片居左
1. 我的发现过程
中午在吃过午餐后, 休息是无意中看到了@winniex的文章绘本6:Jeremy Draws a Monster 杰里米画了个小怪物问中图片的排版方式

因为正好是做web前端的所以明白这样排版的原理.顺手看了下代码.

正是代码中的pull-left的样式效果让图片居做显示了.
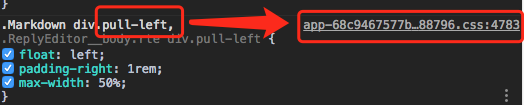
我查看了所以的文章pull-left都来自于图中的文件app-68c9467577b434888796.css, 这个文件的作用就是产生我们看到的页面效果.
进入到这个文件中发现这一段样式代码, 这些代码就控制我们用markdown写文章的样式.
.Markdown {
  font-family: 'Source Serif Pro', serif;
  font-size: 120%;
  line-height: 150%; }

.Markdown.MarkdownViewer--small {
  font-family: inherit;
  font-size: 110%; }
  .Markdown.MarkdownViewer--small img {
    max-width: 400px;
    max-height: 400px; }
  .Markdown.MarkdownViewer--small div.videoWrapper {
    max-width: 480px;
    padding-bottom: 270px; }

.Markdown, .ReplyEditor__body.rte {
  overflow-wrap: break-word;
  word-wrap: break-word;
  word-break: break-word;
  -webkit-hyphens: none;
      -ms-hyphens: none;
          hyphens: none; }
  .Markdown h1, .Markdown h2, .Markdown h3, .Markdown h4, .Markdown h5, .Markdown h6, .ReplyEditor__body.rte h1, .ReplyEditor__body.rte h2, .ReplyEditor__body.rte h3, .ReplyEditor__body.rte h4, .ReplyEditor__body.rte h5, .ReplyEditor__body.rte h6 {
    font-family: "Source Sans Pro", "Helvetica Neue", Helvetica, Arial, sans-serif;
    font-weight: 600; }
  .Markdown h1, .ReplyEditor__body.rte h1 {
    margin: 2.5rem 0 .3rem;
    font-size: 160%; }
  .Markdown h2, .ReplyEditor__body.rte h2 {
    margin: 2.5rem 0 .3rem;
    font-size: 140%; }
  .Markdown h3, .ReplyEditor__body.rte h3 {
    margin: 2rem 0 0.3rem;
    font-size: 120%; }
  .Markdown h4, .ReplyEditor__body.rte h4 {
    margin: 1.5rem 0 0.2rem;
    font-size: 110%; }
  .Markdown h5, .ReplyEditor__body.rte h5 {
    margin: 1rem 0 0.2rem;
    font-size: 100%; }
  .Markdown h6, .ReplyEditor__body.rte h6 {
    margin: 1rem 0 0.2rem;
    font-size: 90%; }
  .Markdown code, .ReplyEditor__body.rte code {
    padding: 0.2rem;
    font-size: 85%;
    border-radius: 3px;
    border: none;
    background-color: #F4F4F4;
    font-weight: inherit; }
  .Markdown pre > code, .ReplyEditor__body.rte pre > code {
    display: block; }
  .Markdown strong, .ReplyEditor__body.rte strong {
    font-weight: 600; }
  .Markdown ol, .Markdown ul, .ReplyEditor__body.rte ol, .ReplyEditor__body.rte ul {
    margin-left: 2rem; }
  .Markdown table td, .ReplyEditor__body.rte table td {
    word-break: normal; }
  .Markdown p, .ReplyEditor__body.rte p {
    font-size: 100%;
    line-height: 150%;
    margin: 0 0 1.5rem 0; }
  .Markdown img, .ReplyEditor__body.rte img {
    width: auto;
    max-width: 100%;
    height: auto;
    max-height: none; }
  .Markdown iframe, .ReplyEditor__body.rte iframe {
    max-width: 100%;
    max-height: 75vw; }
  .Markdown div.pull-right, .ReplyEditor__body.rte div.pull-right {
    float: right;
    padding-left: 1rem;
    max-width: 50%; }
  .Markdown div.pull-left, .ReplyEditor__body.rte div.pull-left {
    float: left;
    padding-right: 1rem;
    max-width: 50%; }
  .Markdown div.text-justify, .ReplyEditor__body.rte div.text-justify {
    text-align: justify; }
  .Markdown div.text-right, .ReplyEditor__body.rte div.text-right {
    text-align: right; }
  .Markdown div.text-center, .ReplyEditor__body.rte div.text-center {
    text-align: center; }
  .Markdown div.text-rtl, .ReplyEditor__body.rte div.text-rtl {
    direction: rtl; }
  .Markdown div.videoWrapper, .ReplyEditor__body.rte div.videoWrapper {
    width: 100%;
    height: 0;
    padding-bottom: 56.2%;
    position: relative; }
    .Markdown div.videoWrapper iframe, .ReplyEditor__body.rte div.videoWrapper iframe {
      position: absolute;
      width: 100%;
      height: 100%;
      left: 0;
      top: 0; }
前面的pull-left的代码效果也在其中, 而且还有一个pull-right的效果
.Markdown div.pull-right, .ReplyEditor__body.rte div.pull-right {
    float: right;
    padding-left: 1rem;
    max-width: 50%; }
  .Markdown div.pull-left, .ReplyEditor__body.rte div.pull-left {
    float: left;
    padding-right: 1rem;
    max-width: 50%; }
2. 如何使用
-
图片居左显示, 在
markdown编辑器中<div class="pull-left"> 直接放图片链接 </div> -
图片居右显示
<div class="pull-right"> 直接放图片链接 </div> -
另外还可以
text-justify,text-right,center可以设置文字的对其方式, 只需将上面的pull-right替换即可.
https://cdn.pixabay.com/photo/2017/11/25/17/17/sandwich-2977251_960_720.jpg
https://cdn.pixabay.com/photo/2017/11/25/17/17/sandwich-2977251_960_720.jpg
3. 建议
偶尔一两张图片可以有这种方法, 多了反而会导致页面变乱,而且不好控制, 这也是为什么没有这个的原因.
markdown的出现就是为了让我们能更专注在内容上面. 我们始终记住内容再是根本.
Replies (3)
没错!
感谢分享:)
Congratulations @jiayuqiu! You have completed some achievement on Steemit and have been rewarded with new badge(s) :
Click on any badge to view your own Board of Honor on SteemitBoard.
For more information about SteemitBoard, click here
If you no longer want to receive notifications, reply to this comment with the word
STOP