

Community post
Staking [PRiVCY Coin] with Raspberry Pi

Hardware Requirements
- Raspberry Pi 3 model B+ (1GB RAM)
- 32GB MicroSD Card
Step 1: Setting up Raspberry Pi OS
-
Download the latest Raspberry Pi OS (Rasbian Stretch Lite) from the official website: https://www.raspberrypi.org/downloads/raspbian/
-
Burn the OS to SD Card with Etcher.

-
Now, to enable SSH for the OS, access the boot partition of the SD Card.
sudo touch ssh -
Enable WiFi connection.
sudo nano wpa_supplicant.conf -
Enter the following config
country=GB ctrl_interface=DIR=/var/run/wpa_supplicant GROUP=netdev update_config=1 network={ ssid="<wifi name>" psk="<wifi password>" } -
Now, insert the SD card into Raspberry Pi then power on.
-
Find the IP address from your router admin web panel.
-
Connect to Pi for the first time
ssh -p 22 pi@{IP-addresss}
Step 3: Hardening Raspberry Pi
-
Configure Pi locale, to prevent warning messages and compilation errors.
sudo raspi-config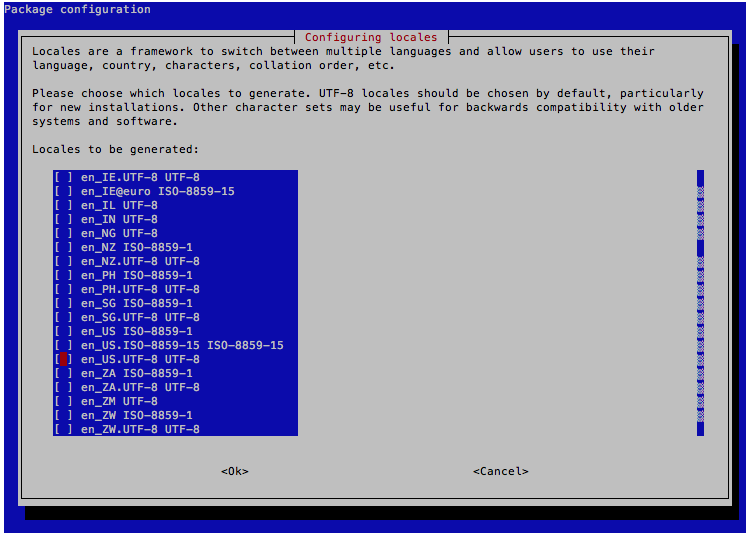
-
Don't forget to edit the locale file too.
sudo nano /etc/default/locale -
Add the following content.
LANG=en_US.UTF-8 LC_ALL=en_US.UTF-8 LANGUAGE=en_US.UTF-8 -
Hardening security by adding a new user.
sudo -i adduser <yourusername> adduser <yourusername> sudo -
Then reboot Pi.
sudo reboot -
Then connect back as the new user
ssh -p 22 <yourusername>@<ip-addresss> -
And delete the default Pi user
sudo deluser pi
sudo passwd root
Step 4: Configure Raspberry Pi
-
Update Pi packages.
sudo apt-get update sudo apt-get upgrade -
Reboot the system.
sudo reboot -
Install the required libraries.
sudo apt-get install git qt5-default qt5-qmake qtbase5-dev-tools build-essential libboost-dev libboost-system-dev libboost-filesystem-dev libboost-program-options-dev libboost-thread-dev libssl-dev libdb++-dev build-essential libtool autotools-dev autoconf pkg-config libssl-dev libboost-all-dev libqt5gui5 libqt5core5a libqt5dbus5 qttools5-dev qttools5-dev-tools libprotobuf-dev protobuf-compiler libqrencode-dev autoconf openssl libssl-dev libevent-dev libminiupnpc-dev sudo apt-get install autotools-dev autoconf automake bsdmainutils build-essential git sudo apt-get install libtool libssl-dev libboost-all-dev pkg-config sudo apt-get install libqrencode-dev libminiupnpc-dev libevent-dev libcap-dev libseccomp-dev -
Have a coffee, come back after 10 minutes.
Step 5: Install & Compile PRiVCY daemon
-
The compilation for Raspberry Pi is not straightforward. Here's my handy script that:
- Download the source for Github.
- Compile required libraries.
- Configure build files.
- Compile daemon.
- Copy daemon to home folder.
You can check the content of the script here.
wget "https://gist.github.com/stiucsib86/9eca3c814d5af2308d6d57f227d65f7f/raw/fed383f434d62dc5ae8ee214933f7c257c9d53c1/privcy-raspberry-pi.sh" -O privcy-raspberry-pi.sh chmod +x privcy-raspberry-pi.sh -
Run the script in background.
sudo nohup ./privcy-raspberry-pi.sh & -
Come back after 2 hours.
Step 6: Setting up PRiVCY daemon for first-run
-
Setup PRiVCY.conf to connect to the correct node
nano ~/.PRiVCY/PRiVCY.conf -
Paste the following content.
testnet=0
listen=1
server=1
daemon=1
maxconnections=90
rpcuser=<YourIrrelevantUsername>
rpcpassword=<YourIrrelevantPassword>
rpcport=18580
rpcconnect=127.0.0.1
rpcallowip=127.0.0.1
addnode=otwsvate4vvogbrt.onion:17770
addnode=nufiijzpo7ac2k6u.onion:17770
(Note: You should always double the check correct nodes from official Github Repo).
-
Copy your wallet.dat and paste in ~/.PRiVCY/ folder.
Step 7: (Optional) Setting Startup Daemon
-
You can setup cron to automatically start PRiVCY daemon when system boot up.
mkdir ~/logs sudo crontab -e -
Append the following:
@reboot sudo -u <yourUser> /home/<yourUser>/PRiVCYd >> /home/<yourUser>/logs/crontab.log 2>&1Note: The last part is to send all output to a log file so you can check that if you still have problems
Step 8: Done!
-
Fire up PRiVCY daemon!
cd ~ ./PRiVCYd -
Happy staking!

-
Psst, don't forget to buy me coffee :D
PRiVCY: PLxacTDxY5EYsTk2538s6nCbVGm4mqB74z
TODO
- walletpassphrase
- clear bash history
- add swapfile - https://pivx.freshdesk.com/support/solutions/articles/30000027088-how-to-set-a-swapfile-on-the-raspberry
Replies (2)
Congratulations @stiucsib86! You have received a personal award!
Click on the badge to view your Board of Honor.
Wew fishballllls
Posted using Partiko Messaging