

Community post
Bulwark Mining Guide
In this post I’m going to be showing you how to start mining Bulwark on a pool whether it’s with AMD or Nvidia GPU’s. Several options are linked in the announcement on the BitcoinTalk forums. Link to ANN
AMD
Step 1- Download and extract SGMiner 5.6.1 You could use any SGMiner fork with a NIST5 or Talkcoin-mod kernel, but the included Talkcoin-mod kernel in this fork provided the best hashrate in my testing, as well as the easiest setup.

Step 2- Download, extract, and run the Bulwark QT wallet.-

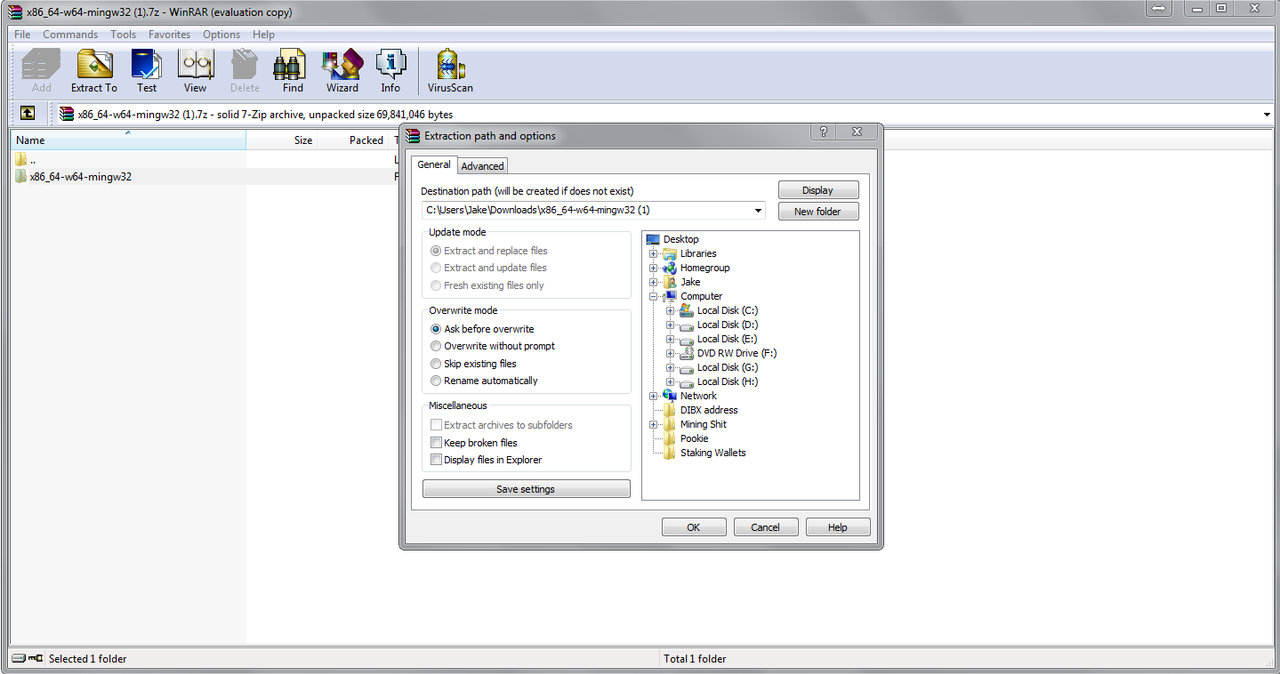
Step 3- Open the wallet, choose a location for the chain data files (i usually make a file for it alongside my wallet) allow it to sync for a little bit, then go to the “Receiving addresses tab”


Step 4- Click the “request payment” button on the receive tab to generate a Bulwark address.

Step 5- Now we create the Start file. Go to the extracted file, create a new text document. Paste in the following;
sgminer -k talkcoin-mod -o pool url:port -u username.workername -p password -I 15
This is the standard SGMiner .bat. The only variable that needs changing is the Intensity and your password. The intensity you find to work best for you may differ but on my RX480 with nearly stock clocks, i find -I 20 to work the best.
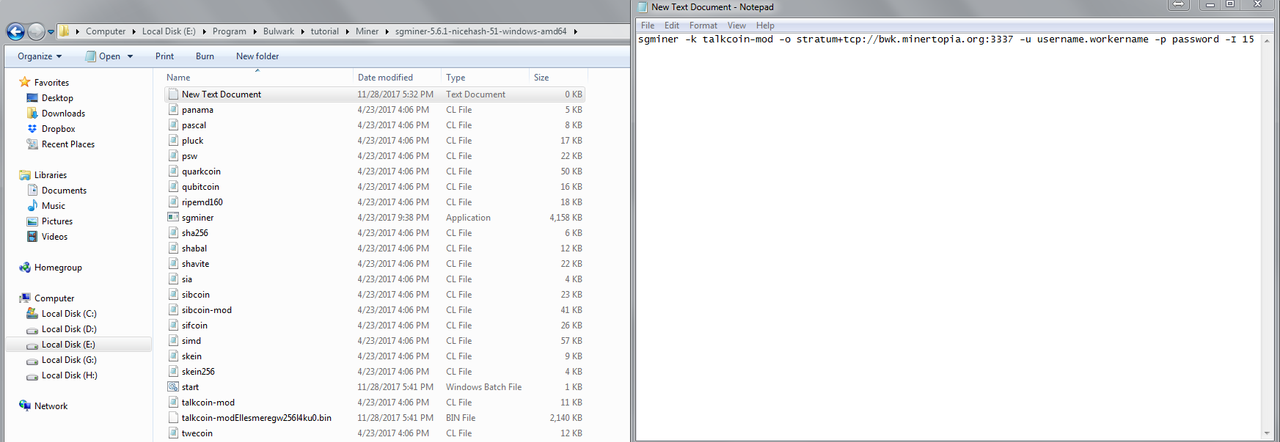
Step 6- Now we input all relevant info into the text document. Pool URL, your wallet address or username/workername, password, and intensity

Step 7- Save the text document as a .bat file and close it.

Step 8- Click on the .bat to initialize the miner, give it a moment to connect to the pool, and your mining!

Nvidia
Step 1- Download and extract TPruvot's CCMiner 2.2. Best practice is to use the newest release of CCMiner, unless the algorithm you’re trying to mine isn’t supported yet.


Step 2- Download, extract, and run the Bulwark QT wallet.-
Step 3- Open the wallet, choose a location for the chain data files (i usually make a file for it alongside my QT) allow it to sync for a little bit, then go to the “Receiving addresses tab”
Step 4- Click the “request payment” button on the receive tab to generate a Bulwark address.
Step 5- Now we create the Start file. Go to the extracted file, create a new text document. Paste in the following;
ccminer-x64 -a nist5 -o pool url:port -u username.workername -p password
This is the standard CCMiner .bat. There are more options you can play with in the
Readme file of CCMiner, but this is the basic framework you will want to follow to start with.
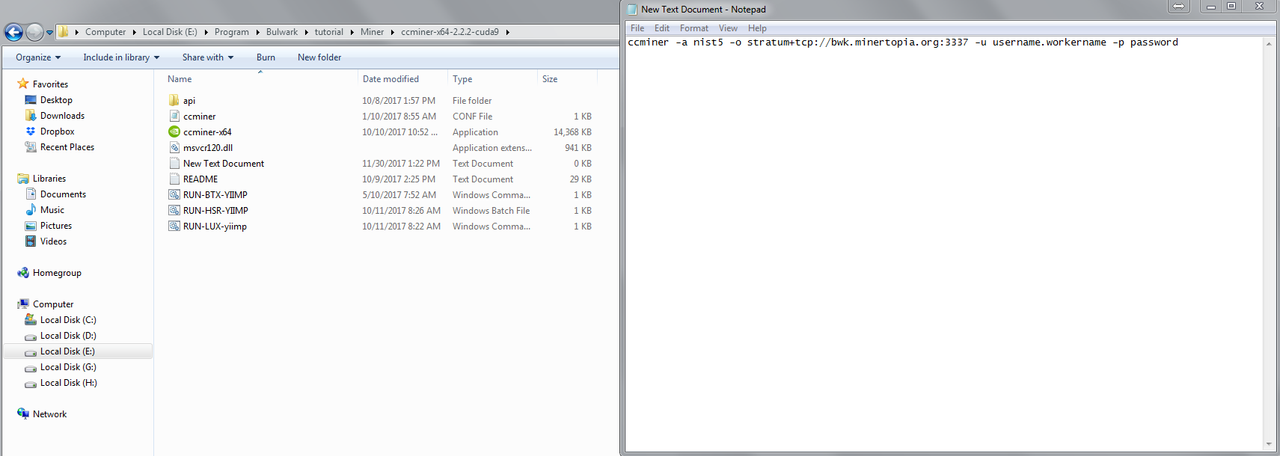
Step 6- Now we input all relevant information into the text document. Pool URL, your wallet address, and username/workername, password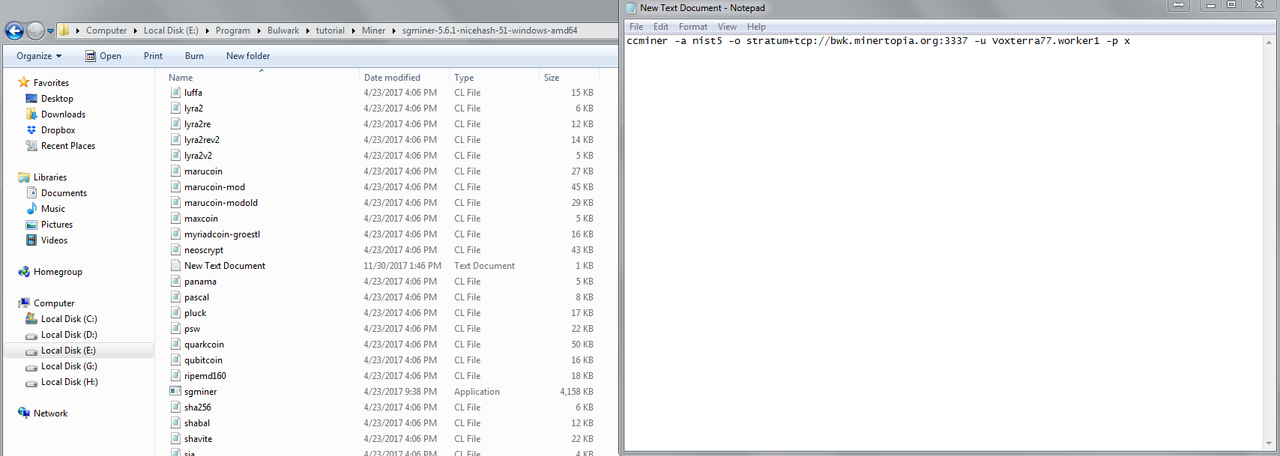
Step 7- Save the text document as a .bat file and close it.

Step 8- Click on the .bat to initialize the miner, give it a moment to connect to the pool, and you’re mining!
Donation Address
BWK- bYkSSBBYa9FKfR72q9pHMeXcRShQCN3C1h
Replies (17)
Hello!
This is an excellent walkthrough. Thank you for this submission!
Congratulations @voxterra77! You have completed some achievement on Steemit and have been rewarded with new badge(s) :
Click on any badge to view your own Board of Honor on SteemitBoard.
For more information about SteemitBoard, click here
If you no longer want to receive notifications, reply to this comment with the word
STOPHow many Bulwarks make up a Masternode?
At least for the AMD part, I wasn't able to start mining using the instructions/screenshots provided - they seem to be misleading.
Instead, I used the instructions from https://pool.minertopia.org:
sgminer -k talkcoin-mod -o stratum+tcp://pool.minertopia.org:3833 -u YOUR_WALLET_ADDRESS -p OPTIONAL_PASSWORD -I 20I also had to add
--gpu-platform 1for sgminer to start with my 6x RX580 configuration.Have fun mining!
Been mining all day at stratum+tcp://eu1.miningpool.shop:3833 and still nothing. Do I have to wait for an entire coin buy it is sent to me. I have generated a BWK address like recommended.
Only getting 45/mh/s
never mind, just got my first payment. And if prices hold, this is a lot more lucrative for the time being to mine than etn
I'd friendly recommend you to start mining Bulwark Coin (nist5) on the https://bulwarkpool.com
They have great services out there.
Cheers!
Fellow miners we would like to see you join our pool MASTERHASH ! ( OLD BLOCKSUCKERNATION )
We offer you the following :
See you soon at https://yiimp.masterhash.us/
Thanks for the input, I tend to do everything for single GPU setup's since that's what i'm currently using. I'm going through it and editing a few things now, i'll be sure to add that in, thank you!
5000 BWK
Frequency of payouts depends on the pool's specifications, how many blocks to pool is successfully getting, and what percentage of the pools hashrate you are.
So once mining was released in to the wild, we discovered a few new things.
If you are using a multi-GPU setup with SGMiner, add --gpu-platform 1 to the end of your .bat to enable it to use all of your GPU's.
For NVidia, this has proven to be a more efficient miner than the CCminer 2.2 that we had originally tested.
A sample bat for Alexis78-
ccminer-alexis -a nist5 -o stratum+tcp://(pool) -u(<address) -p c=BWK
pause
Congratulations @voxterra77! You have completed some achievement on Steemit and have been rewarded with new badge(s) :
Click on any badge to view your own Board of Honor on SteemitBoard.
For more information about SteemitBoard, click here
If you no longer want to receive notifications, reply to this comment with the word
STOPDear miners we would like to see you join our pool BULWARKPOOL! ( OFFICIAL )
We offer you the following :
Discord support at https://discord.gg/eKTwKwe
Join us today, happy mining at - https://bulwarkpool.com
Using NVIDIA I cant seem to get the mining to start. It starts and then the window closes instantly any solutions?
Thanks for the post, was setting up Bulwark mining and ran into a snag with my bat file setup and google led me here.
I'm running a AMD XFX R9 390 card, can you suggest an intensity setting I should use vs. default of 8? Thanks
Congratulations @voxterra77! You received a personal award!
You can view your badges on your Steem Board and compare to others on the Steem Ranking
Vote for @Steemitboard as a witness to get one more award and increased upvotes!